
Today, I was with Elmera. I made doodles, and then I swapped with her. Elmera saw seaweed or kelp in mine. On the first line I wrote one word, then the second I wrote two words up till five words and then back to one. I liked doing this.

Today, I was with Elmera. I made doodles, and then I swapped with her. Elmera saw seaweed or kelp in mine. On the first line I wrote one word, then the second I wrote two words up till five words and then back to one. I liked doing this.

Today we explored what were quality blog comments. We looked to see if they had a greeting, and something positive about what the author has shared. We also checked to see if they had thoughtful and helpful comments too. We had to move and rotate the labels too.

Today, I have been reading about dinosaurs. After reading I was outlining my sauropod’s body using poly lines. Then I dragged the labels for its body to the right place. These dinosaurs lived in New Zealand millions of years ago but now they are extinct.

Tēnā koe,Room 10 this is St Patrick’s school. This poster looks amazing Room 10. This poster looks very colorful. Did everyone enjoy the day?. What was your favorite fairy tail? We enjoyed to look at your poster today. I hope you have a good day.Nofo a Room 6.
This term in RE we are talking about how special our families are. We talked about a New Zealand artist called Reuben Paterson. He went to a beach with black sand once and he likes to put glitter on his pictures because it reminds him of the sparkling sand.
I can show my family using koru patterns. I made me, my two sisters, and my mom, my dad,and my brother. I also added my granny and my papa. I used wax crayons and then I dyed mine red. It looks really good.

today,we learnt how to add a helpful and thoughtful comment to a blog post reply. A helpful tip is to have a buddy read and listen to our comments. some of skills we used today, were arrange to the back, rotate and move our arrows into position.

Today, I learnt how to use Google Maps to find my buddy school and learnt how resize my canvas on Google draw. I learnt that St Mary’s school is close to a River. My tip is to move your fingers slowly across the touch pad when zooming in or out.
Happy Matariki everyone and we had fun making a kite for Matariki. You guys are wondering how me and my classmates made it. How we made it is we got a brown paper bag and we got scissors. We had to cut the brown paper to make two flat shapes. We designed the first brown paper with special patterns. Then we painted the other brown paper and I wanted to do mine orange. My classmates chose their own colours. Then we waited for all the paint to dry.
Today we started to weave our kites and Mrs Agnew had to start me off and then I could go under and over with the strips.
My kite is very pretty and I like it.Finally braided three colours of twine plaited. To make the tail. Then Mrs Yumul glued a feather and some fern branches onto the bottom. I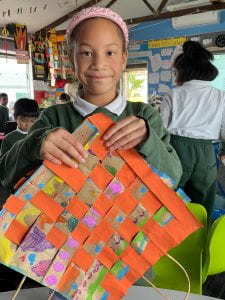 ‘m sooo proud of my kite.
Yesterday I created a Matariki star using diamond shapes that I had to duplicate. Then I learned how to rotate and nudge the shapes together. I grouped the shapes together and then I enjoyed using the colour gradient to add different colours.
This is my star:

Today with Matua Peter we created objects using shapes and colours. I decided to make a rocket. It is really cool when you turn the rocket around so it looks like it is flying in space. It was fun.
